Working against Canvas: three tips

So many instructors, some of whom have used Canvas as their LMS for their on-site classes, are now encountering the system’s complexities and limitations. Teaching fully online is different from posting ones class resources online, or at least it should be.

My advice has changed from three years ago, because Canvas itself has changed.  My reasoning, however, has not changed from eleven years ago. My article on Insidious Pedagogy: How course management systems affect teaching (2009) explained how the designs of learning management system tend to control pedagogy, especially among novice users. We need to spend some time working against the system.

So I’ve reduced my top ten tips to three. And they may well be suitable for LMSs and VLEs other than Canvas.

1) Create full navigation using Pages

As with LMSs of old, Canvas continues to default to grouping content and assignments by type. This is a holdover from Blackboard, which relied on the early computer analogies of “files and folders” to imitate paper filing systems. So “Lectures” can be a folder, “Discussions”, “Quizzes”, etc.

But for most of us, learning is time-oriented, or theme-oriented, not type-oriented. We tend to have units with multiple types of content and activities. Many of these are organized by unit or week. There is no way to express this to students without making a page of links.

Canvas, of course, has a Modules page with a list of links. On the Modules page, you can load in everything, and have students do things in sequence, or with prerequisites, or both. The Modules page is, and has always been, ugly. The most you can do is add emojis to the headings, if you know how. And every item listed on the Modules page is the same size and color, creating the impression that everything listed has the same worth. All you can do is indent, or use caps.

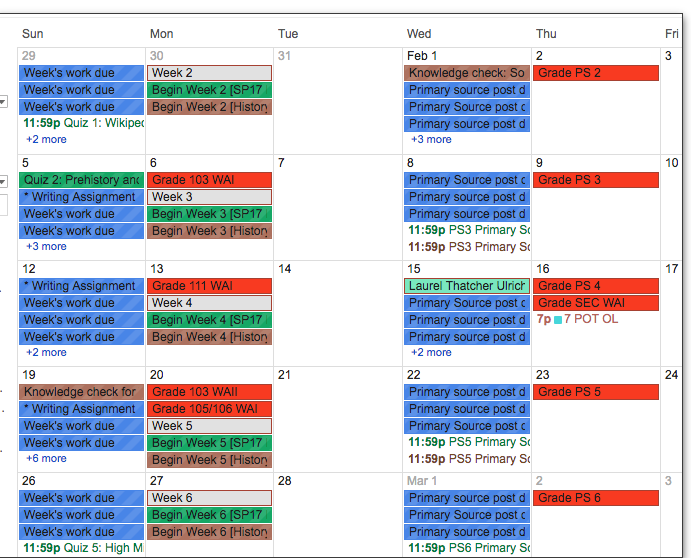
The best Canvas classes I’ve seen have a schedule or grid on the main page:

Each of the links goes to a Canvas page, which has links of the activities and content:

One can of course put all these in the Modules page also, which will enable the “Back” and “Next” buttons for those into sequences and control. Then it’s up to you whether to show that Modules page, because you also ought to. . .

2) Hide menu items

This has not changed from earlier advice: features we are not using, or that we don’t want students accessing from the menu, should not appear on the menu.

For Canvas, this involves going to Settings – Navigation and dragging the items you don’t want visible down to the inactive area. It used to be that when you did this and saved, neither you nor the students saw these items on the menu, and the look was clean. Recently, Canvas changed this so that the instructor sees them all, but with the hidden items indicated by a crossed-out eye.

Well, at least students don’t see them.

3) Do low-stakes stuff anyway

Here working against Canvas means working with it. Students need reasons to work on your class, and to get immediate feedback. This is difficult in Canvas. Doing extra credit, creating short quizzes, using test question banks, all are ridiculously complicated. And there is still no easy way to just copy a quiz.

Canvas will also passively prevent what you want to do. Want to create a discussion forum where everyone who posts twice gets 3 points? Can’t do it. Want to have 20 questions on a 10-point quiz, so each question is worth half a point? No can do. Want to rename an assignment and have all the internal links still work? Good luck. Want to change all 28 due dates to a week later? It’s a one-at-a-time job. (At least there’s a hack for this one.)

It pays to spend some time seeing what can be done with zero-point assignments, and complete/incomplete grades, and the default grade feature in the Gradebook. Students learn from short, formative assessments.

Working against the LMS has always been required for us to teach the way we want to. More and more, I see LMS trainings covering these problems, and teaching the workarounds, which is great. Particularly when your LMS is owned by an equity firm, after going public and answering to shareholders, we can be sure that improvement is unlikely (most Canvas problems have been around since its inception). We must be willing to work against the system.


Class annotation of images

This is another post where I share how I did something, solely so I don’t forget how to do it.

Perusall is a wonderful program for annotating documents with a whole class, and I’m currently using it for all my online classes, which are located in the horror of an LMS they call Canvas. I upload a PDF, and students and I can highlight the document, with a panel popping up for discussion. When anyone clicks on the question mark, it indicates a request for responses. When anyone uses @Someone, it notifies them someone has responded. I have used it to solve the “what if they don’t do the reading?” problem, since we all kind of do the reading together.

All this is great. The system “auto-grades” (though I have to set it then check it very carefully), and pushes the grades to Canvas gradebook on my command, so I can focus on the discussion itself instead of evaluating it.

But you can’t do this with images — just upload and everyone talk about it.

Except…you can. Perusall won’t upload images natively, nor link to images directly on the web. So I downloaded an image, and saved it as a pdf in Preview, then uploaded it. Then I clicked on a section of the picture. Instead of highlighting text, Perusall put a pin. I can then ask a question or make a comment about just that portion of the image. Click the pin, and the conversation panel opens.

But the interface itself takes up a lot of the screen, which we don’t want for images. So I’m going to show students what to do about that:

If they do it, then it will look like this:

More room for the image, less clutter. I’m thinking it would be possible to put several images on a page to be discussed for that week.

What it’s doing is similar to ThingLink, which I learned about from our wonderful art historians over a decade ago. But ThingLink and similar programs, although they can be embedded into Canvas with iframes, cannot track a student’s comments, nor auto-grade them. Perusall can, which shortens my workflow so I can focus on the discussion, just as I do with annotated text.

So, annotations for images when I teach a European history course that focuses on the Humanities, and a History of Technology class that can get bogged down in text? I’m in!


The placement of things

Where’s my stuff?

The placement of things is important. As with medieval manuscripts, what is not stored properly is essentially lost to all humanity. After 20 years working online, I here report on where I keep things at present.

Public ok or intended: Google

My syllabuses are on Google Docs anyone can view, department business and drafts are Docs for others to share and edit, student surveys are in Google Forms. My slide presentations for class are Google Slides (it’s a damn shame you can’t do music easily on the slideshows – they really are letting it, um, slide). My talking head videos are on YouTube with captions.

MiraCosta College only: Canvas

As all our college’s instructors move to the Canvas LMS (more’s the pity), this becomes the default. Of course, once everyone has 143 course cards showing on their main screen, scroll weariness is bound to set in and many won’t be accessed. The extremely limited discussion functionality of the system will also discourage open discussion (as will the fact that admins can access it on request at any time). Nevertheless, campus projects as well as courses are popping up like so many daisies. I remember this happening with Blackboard. The college has a server where I kept my home page, but they declared these are being deleted due to security issues (which my pages didn’t have, BTW).

The only LTI I use in Canvas consistently is Perusall, where I have uploaded the primary sources for students to read and discuss. Hypothes.is is always on the back burner, as I wait for automatic group logins and an easier interface.

Stuff I want to control: Reclaim

My shared hosted account at Reclaim Hosting is where I am moving (or have moved) everything which I want control, including privacy settings. This blog is there.

It also serves my zillions of web pages that make up my class content (lectures, information pages, etc.) which I embed or link to from Canvas. I have left Dropbox and use Owncloud via the Reclaim server installation; I have left Netvibes and use TinyTinyRSS via the Reclaim server. I am still seeking a substitute for Diigo (which will import it as well).

Mail: Various + Gmail aggregation

MiraCosta has its own mail server, which uses Outlook, a system I find needlessly cumbersome and relatively feature-free. I POP that into Gmail — it’s only inconvenient when people use the Outlook groups. I have two Gmail accounts, one personal and one professional, inside Google, so that’s obviously Gmail. My main personal email is run from Reclaim with my domain, and IMAP’d into Gmail. All mail comes in with tags so I know what’s what. I also back up my Gmail to Apple Mail (which I don’t otherwise use).

Research

After much flailing around, it’s Zotero for gathering resources and bibliographical entries, and (at last) Scrivener for drafting. Manual backups to hard drives. Diigo still for gathering web resources (I’m still working on that – any suggestions for self-hosted?).

Things That Mustn’t Get Lost

Everything crucial is on hard drives: one for work, one for household, one for work media files, one that backs up the others. Dreamweaver to ftp back and forth to the Reclaim servers.

Bric a brac around the web

I’ve had more services close down on me than most people ever used, which helped foster my natural cynicism about web services. I still have a Tumblr account with things I have stored, though I rarely access it – it’s like a time capsule now. I have zillions of accounts (Slideshare, Blabber, things you’ve never heard of going back to the beginning of the millennium) that won’t let me delete them.

Videos that YouTube won’t serve, or for which I want excellent quality, are on Vimeo. I have a Pinterest account I sometimes use for collecting web images, and once used for an Honors class. I have a Flickr account that won’t be used anymore as they have created limits and pricing and I’m not sure why I need it, so it’s a time capsule too. I’d rather sort out how to do galleries on this blog.

Phones and downgrading

In several areas, I have remained static while others have moved on, because some things just work: Microsoft Word and Excel, Dreamweaver. The changeover to Canvas LMS left me unlikely to jump at new shiny technologies for teaching.

Privacy issues play havoc with my calendar. For decades I carried a paper calendar, first small, then large, then small again. Now I use the Calendar on my mobile phone, which is Google and Android, so it tries to force everything into the first category: Public. I don’t want my Calendar public. After trying to make different apps and reminders work on my phone, and being encouraged by this recent NY Times article, I am about to downgrade back to paper. I carry a paper notebook anyway, after (again) trying to use my phone. For notifications, I’ll set them manually — it’s a lot easier to do that for a few things than adjust them all for the rest of the crap.

Ethical issues are a problem with Facebook, where I belong to several groups and run the Online Teaching Group. For the latter, I have people asking to join for purposes that have nothing to do with sharing online teaching problems and solutions: I get requests from highly questionable “education” organizations, people who want to advertise, people soliciting sex or money. Combine this with Facebook’s privacy problems (I stopped using it for student groups long ago), and I am encouraged to downgrade (thus the new listserv).

Since I’m sure I’ve forgotten things here, I have not solved the medieval manuscript problem. But the things I need on a daily basis are much fewer than they used to be, when I spent much of my time exploring tools on the web. Call it the downgrading of my time, if you will.

Thus my best tech winner for 2019: the MUJI double-ring A6 notebook.

Calendrically speaking

I have always been a big fan of paper calendars. But when it comes to teaching, there are many things I need to put on a calendar that are the same from semester to semester. My solution recently has been creating a spreadsheet calendar, putting in these recurring items (grade primary sources, grade Writing Assignment III, etc), then printing it out and writing in the dates.

After almost three decades working with Microsoft products, I could not figure out how to get the pages to print correctly.

Why do I need such a calendar, when the LMS has its own calendar? For the first time since Blackboard days, I will be teaching in three different systems: MiraCosta’s Canvas (two classes), MiraCosta’s Moodle (four classes), and free Canvas (one class). This is how I will transition from Moodle to Canvas over the next 18 months.

The Canvas and Moodle calendars, plus my own grading calendar, would need to be in the same place to do this electronically. So today I used the URL from the Canvas and Moodle calendars, and put them into Google’s calendar, then added my grading tasks.

Both LMSs, unfortunately, export the full calendar (all classes), not each class – this is a problem because Google imports them all as one calendar, with all tasks in the same color regardless of which class it is. I wanted a separate Google calendar for each class. Luckily, I was able to solve this for Canvas by exporting each course’s calendar from Student View, as recommended by Chris Long in the Canvas Community. There is no way to do this for Moodle, but it didn’t matter, because both sections are of the same class and on the same calendar.

Now I have all tasks in one place, accessible on my phone or on computer.

I’ve never not used a paper calendar of some kind (yes, I know, call me steampunky), so we’ll see how it goes.

Canvas But Cool: Embedding Announcements

I hope to start a series of posts here on things I’m doing in Canvas, but that are cool anyway. Some will be workarounds, some ideas for making things look better, some techniques born out of utter frustration.

None will be as brilliant as what Laura Gibbs is doing at the University of Oklahoma  – she’s got LOL Cats rotating through her Canvas pages using a cool javascript. But her work inspires me and encourages me to find things that are Canvas…But Cool.

My first concerns Announcements. In Moodle (many of my posts will start “In Moodle”, an approach dreaded by many in the Canvas Community) I could just paste Announcements in at the top of the main page, and copy or adapt them into Latest News for instant emailing to all. In Canvas, the Announcements page is decidedly a separate thing. If I don’t want announcements to be the main Home page, they won’t be obvious except by email or other notifications.

But I don’t want to post twice, once in Announcements and once by editing the Home Page. I want the Announcements to dynamically appear on the Home page, where I want them to. So I followed the wonderful instructions posted halfway down this page at the Canvas Community (I’d love to link directly to the post, but you can’t do that there), posted by Sharmaine Regisford with thanks to others.

Instructions:

1. First, post an Announcement in your class (I just did a welcome message).

2. Grab the feed URL for the announcements by going to the Announcements page and right-clicking on the RSS symbol (it won’t be there if you didn’t post a first Announcement).

The URL should end with .atom.

3. Go to FeedWind at http://feed.mikle.com.

4. In the spot, paste in the feed URL.

5. Choose your settings. I like 1 feed height, scrollbar on, autoscroll off, text-only, max length 132 characters.

6. Grab the regular code from the right side, not the iframe code.

7. Start a new text document on your computer and paste the code.

8. Save the file as .html.  

9. Go to Canvas and open Files. Upload the .html file you just created to your Canvas course files. Once it’s there, mouse over the name of it to find the document number – write it down somewhere.

10. Go to the page where you want the Announcements to appear. Switch to HTML editor.

11. Paste this in:

/courses/#######/files/#########/download

In this example the first ####### is your course number and the second ######### is the file number.

The course number is in the URL of your Canvas course:

So for this example, that would be:

/courses/6660/files/57294/download

The result is an iframe on your page that will always show the most recent announcement (so long as you chose that on the settings at FeedWind).

Update: As of this week, Canvas provides the option to add announcements to the top of your home page. Not as pretty, but it works:

Fun with YouTube: the pure embed

I like using YouTube clips for my classes, but I don’t like the clutter: links to other videos when it’s done playing, the title showing at the top, low quality. So I play with the embed code:

//www.youtube-nocookie.com/embed/yodnppdZh2M?rel=0&vq=hd720&showinfo=0

See what I’ve added after the video code, ending with the ?
rel=0 > YouTube adds this when you deselect the “show related videos” on the embed code

vq=hd720 > means to show it in maximum resolution or HQ if it has it

showinfo=0 > to get rid of the title showing at the top of the clip

That’s better.

Adventures in Accessibility: Part I

Yes, it’s a pain. Yes, it stifles our creativity. No, it doesn’t make sense to pretend that we can make every online learning artifact accessible to everyone with any type of disability, be it physical, cognitive, emotional, socio-economic, or educational. But we do it anyway. Not because we believe in the dogmatic, administrative, litigation-phobic approaches of universal design, but because it’s cool to do it, when we can.

So I’m taking a closer look at some of my multimedia, to see what can be made more accessible to people with certain types of issues, or, better, to be made more interesting and comprehensible to all students.

The first discovery: YouTube’s captioning is so much better than it used to be! Log in. Upload your video. Wait overnight (or sometimes just a few hours). You can even set the video to private. YouTube will create captions as best it can. Select the cc button, and see the captions in a sidebar. Click edit and edit them. You can set the video to stop running when you type.

Oh, you say you have a transcript? Perfect. Just upload your video and select the option to transcribe instead. Paste in the transcript. YouTube will set up the timings as best it can.

youtubecaptions

Sliders are now available to move the caption around on the clip. You can even see the audio waveform below to help. You can insert caption bits. Then save.

But wait, it gets better. Don’t like YouTube? Want to serve your video elsewhere. Download the captions using the actions menu (.srt format is pretty standard). Then you can upload it somewhere like Vimeo or Dailymotion, which has better video quality and no ads.

BYO OER

I struggle with textbooks, yet I need a form of context that students understand intuitively. In my rejection of traditional texts, I have been exploring both the new online pathways-though-text offered by publishers like Cengage and Pearson. My experiment with Pearson went badly, and reminded me that the answer is still open resources, free if possible.

Right now all my classes have these elements:

  • Textbook or context reading, sometimes with quiz questions (about 15% of student time)
  • Lectures I’ve written and recorded, with quiz questions I wrote (about 20% of student time)
  • Primary sources inside those lecture, and that used to be in my printed workbook (about 10% if they read them)
  • Constructivist primary source collection creation and writing (about 40%)
  • Writing on those collected primary sources (about 15%)

The main challenge is how to balance the textbook reading, and any accountability via quizzes, with the rest of the workload, particularly the primary sources inside the lecture.

US History II

Open Education Resources include history textbooks, but there are very few. OpenStax_US-History_700x906After much searching, I have discovered one I like for US History II, even though it is left-leaning (a whole chapter on the New Deal? really?) and needs some reorganizing. Unlike most of the OER history texts, it has review questions, is written and peer-reviewed by historians, and comes out of a respected university (Rice). It even looks like a textbook. OpenStax’s system allows a somewhat cumbersome but handy way to reorganized the sections and chapters. I can even rename them. After about 24 hours, it creates a solid PDF version of the book, with a table of contents, repaging and automatic transferring of questions and terms to the appropriate section. While it will take time to extract the questions for quizzes, I think it’s worth it given the quality of the text. I will likely lose the focus on the primary sources inside the lecture – the textbook is too large. But since my US students tend to be at a lower level than my other classes, they likely need both the security of an ordinary-looking textbook and the information it provides. I am testing chapters this semester in all three online sections, even without quiz questions.

But US is it. There are no similar quality resources available for Western Civ, World History, History of England, or History of Technology (my new class!).

History of Technology
BookCreatorSo for Western Civ I tried to create a book from Wikpedia articles, using Wikipedia’s Book Creator. This has not gone well. Wikipedia is for the most part fine from a factual perspective for common areas of history, but some sections are written in too much detail by total fanatics of that particular era or subject. I have spend many hours trying to make it work. For History of Technology, however, I might just need a basic Western Civ overview as background – all else would be articles and primary sources, in addition to lectures. I have created a book from a single overview article. I can add my own stuff with PDF using Preview, perhaps, or just have it online.

Western Civ

103bookFrustrated with the Wikipedia book, I began copying Wikipedia text of the sections I liked into a Word document, and editing. For Western Civ I, I have finished. I have a complete textbook of Wikipedia text edited carefully by me, with main terms in bold, the primary source documents from within the lecture included at the end of every chapter, and quiz questions I wrote from the resulting book. I am using it for the first time this semester in both the online and on-site sections of the class.

It will take time, but it looks like I’ll be doing the same for Western Civ II.

History of England

It is the only class with a published item students much purchase. I wrote my own quiz questions out of it. When they stop publishing The Penguin Illustrated History of England and Ireland, I’m in trouble.

Conclusions

I have had to take open resources in hand myself – I have found nothing that can be adopted wholesale, like a traditional texts. But traditional texts have their own problems, of coverage, rigidity, poor supplements, bad quiz questions, etc. And history texts are costing over $100 now, which wouldn’t be so bad except they aren’t good enough for that kind of money. And my own texts I can edit, re-edit – they can evolve over time at no cost to the student except for printing if they’d like to print.

I’d like to share all this. The Wikipedia books aren’t mine – I’ve done the editing but only written some of the text, and adding documents I have been using for years, most of which have passed copyright clearance on more than one occasion when custom published in previous book efforts. If I do construct quiz banks out of the OpenStax chapters, I’d like them to be available for others to use (my created book already is, inside the OpenStax CNX system). OER should be, well, O.

But it looks like it’s not enough to do OER. Looks like you have to create Build-Your-Own OER.

Embed is the new Save As

As you know, I’ve been mourning the disappearance of two key technologies: the slidecast function in Slideshare (which could sync an audio file to a slidestack) and the annotation function in Flickr (which enabled mouseover notes on an image).

Then Alan Levine posted that he’d found a slidecast working in an embedded version.

AlanSlideshare

At first I had trouble finding a Slidecast I’d embedded somewhere. Then I looked at some of my slideshows in Slideshare and peered at the truncated URLs of where they’d been embedded. Most were in other people’s LMSs (kind of ironic, actually) but some referred back to sites I control.

slideshareembeds

lisamlane.blogspot? I have a Blogspot blog? So I typed http://lisamlane.blogspot.com into my browser, and … oh!  I didn’t find my slidecast, but I did find my annotated Flickr image of a medieval manor.

Imagine my excitement! No, wait, imagine me up several late nights for hours with Dreamweaver and 33 tabs open trying desperately to figure out how to create hotspots and make an imitation of my annotated Flicker image of a medieval manor, when I didn’t keep a copy of my notes. NOW imagine my excitement!

So I posted and Alan, being his wonderful self, figured out that Mbedr was doing the heavy lifting, and he posted about his found treasures. (Mbedr is a utility I discovered and played with in 2010, thanks to – guess who – Alan – and yes, that image still has its notes too!) And because Alan had talked about View Source in another tweet about Slideshare, I viewed the source and found my notes in the code, so I can recreate the image at 2 in the morning once I figure out the hotspots. I have my text!

notesembed

Then I remembered that I had embedded a whole class of history lecture slidecasts, one at a time, onto web pages, so I could couple them with their audio transcriptions. Sixteen lectures saved!

So embedding preserved our goodies. When Flickr combined the image and the notes, and when a slidecast got embedded in a blog or page, it created something more permanent. It doesn’t solve all our problems, of course – we still can’t get these artifacts out in their original form. But access to anything we embedded seems to be restored!


Following those comments

Since the demise of CoComment and co.mments, it’s been as difficult as it used to be to follow comments on blogs.

Fact is, if people don’t put a subscribe or email followup button on their blog, it’s impossible.

The only solution I’ve found, especially for the POT Cert Class where we have many blogs and lots of commenting, is to make a Google Reader feed bundle out of the comment feeds.

Each WordPress and Blogger blog has a separate feed for all the comments. You can find them by adding “/comments/feed” to a WordPress.org or Edublog URL, or “/?feed=comments-rss2” to a WordPress.com URL, or “/feeds/comments/default/” to a Blogger URL.

It wasn’t all fun and glory. Typepad, unfortunately, only has comment feeds for individual posts, not for the whole blog. Also, these feeds pull in all comments from the blog, not just the ones related to the “potcert” tag (anyone know how to change that?)

I added each participants’ feed into Google Reader and made a bundle, available here.

Although I appreciate Google’s ability to do this, I don’t like reading anything as a bundle or in their Reader. I much prefer Netvibes. So I took the RSS feed from the bundle, and put it into Netvibes:

Not ideal, but at least I can see what’s up on the blogs!